Risk Management
2 mins read
Key Features
Identify risks and create an appropriate response plan with status such as Owned, Accepted, Mitigated or Resolved.
Filter and focus on risks based on various attributes such as impact, owner and response categories.
Have contextual discussions with associated members on the identified risks to create a response.
Attach additional artifacts that can provide further insights on the risks, for quick and easy access.
This release includes the following
Introduce 'Risk' as a new entity that is associated with the release.
Create, update or delete risks.
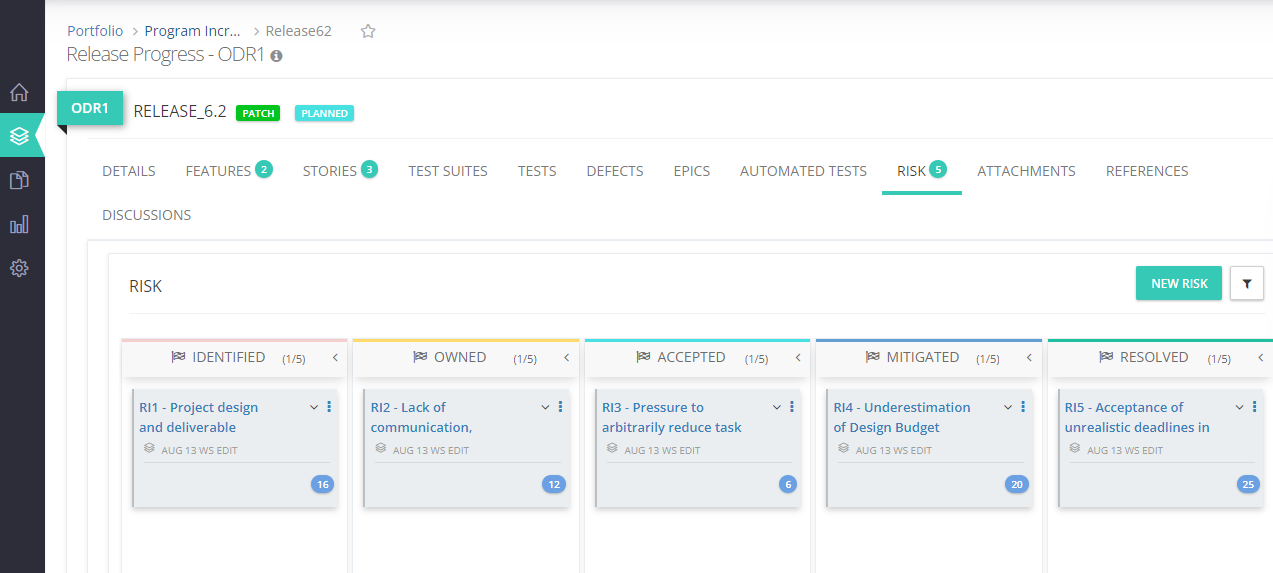
Visualize risks in board view by using the 'Risk Response' category.
Filter risks based on their attributes.
Add or view attachments and references and discussions regarding risk.
Follow these steps to create a new risk for a given release and take appropriate Risk Response
1. Create a new Release (On Demand Release) or open any existing Release.
2. Navigate to Risk and click New Risk.
Note: The default status for newly identified risk is 'Identified'.
3. Enter all the details in the appropriate fields.
4. From the drop-down list, choose the appropriate response plan - Owned, Accepted, Mitigated or Resolved.
Note: When the risk is marked as resolved, it is no longer considered an active risk.
5. Click Save.
Here's what you should stay tuned for
This feature will be enhanced in the subsequent releases with the following capabilities:
Creating a risk repository from which applicable risks can be identified.
Facilitating permissions management.
Cloning and tagging risks.
Importing and exporting risk data.
Linking risks to entities such as Epics, Features, and Releases.
Visibility of Epics Tagged to an On Demand Release
2 mins read
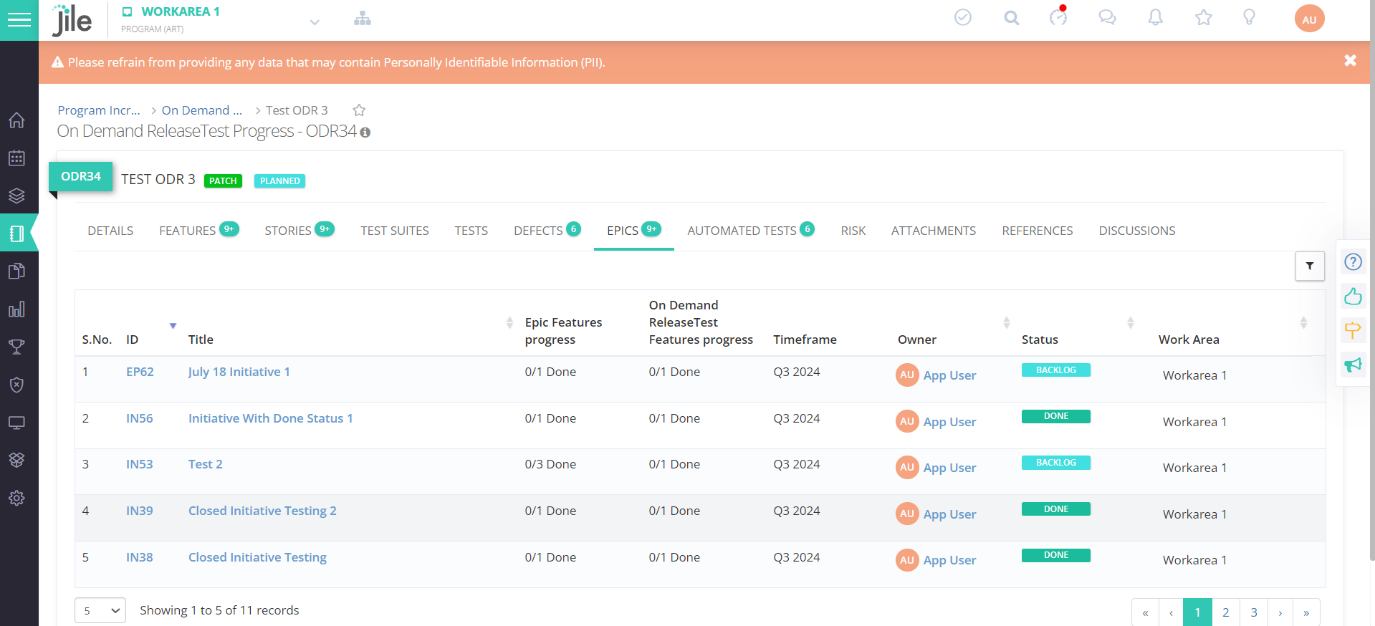
The Release Managers and relevant stakeholders will now be able to oversee the Initiatives, Epics, and User Stories being worked on in a particular Release.
Key Features
- An Epics or Initiatives tab has been introduced within an On-demand Release, which shows the Epics or Initiatives currently being worked on.
- All the information will be automatically derived based on Features linked to the corresponding release.
- The newly introduced tab will also display Epics and Initiatives tagged to multiple releases.
What makes this update useful:
- Enhanced visibility and tracking of Epics and their Features within ODRs to improve transparency.
- Easy monitoring of Epics and their Features ensures better alignment with strategic goals.
- Reduced risk of oversight.
- Streamlined linking and unlinking of Features and Initiatives provides clear visibility into Feature completion for accurate planning and delivery.
- A comprehensive overview of initiatives across different ODRs improves collaboration among stakeholders.
Support for Central Review Teams
2 mins read

Key Features
-
Teams who are authorized to review, provide feedback and finally approve requests from multiple programs are centralized - to achieve optimal efficiency in terms of availability and turnaround time.
-
Users from many programs and products can raise requests for review, feedback or approval from these Central Teams.
-
The Central Teams will be able to send back requests with their feedback and finally approve, when the feedback is incorporated by the respective program or product.
What makes this update useful
-
Central Teams can be included in the PI and Sprint.
-
Various teams can assign approval requests to the Central Teams.
-
Original attributes such as 'Sprint', 'Program Increment', and 'On Demand Release' can remain unchanged while assigning requests.
- Central Teams can view all the requests coming their way from multiple programs and products.
- Users from different programs and products can view the status of their requests, along with any feedback comments.
This release includes the following
-
Creating a Central Work Area and associated Teams.
-
Configuring the Approvals app in the Function browser.
-
Reading, creating, updating or deleting approvals.
- Defining roles for Central Team members.
- Adding filter for approvals.
Follow these steps to use this new Feature
1. Click the hierarchy icon and choose Manage <workarea type>.
For example, Manage Portfolio.
2. Click NEW WORK AREA.
3. Choose the type as Central Work Area and provide other details.
4. Click Create.
5. Create new team(s) within this newly created Central Work Area.
These team(s) will be created as 'Central Team(s)'.
Notes
Note: Teams from a work area that are under the same parent as this newly created Central Work Area will be able to create approval requests and assign to this Central Work Area.
6. To add the Approvals function, on the left menu, click Configure and add 'PI > Approvals' function under the appropriate function group.
For example, add Approvals function within Program function group.
7. Create a new Approval request and assign it to the appropriate Central Work Area and Central Team.
8. When it is ready for review and approval, choose the status as Submitted for Approval.
It is recommended to provide self-review comments that can help the approver during review and approval.
Note: These self-review comments cannot be edited by the approver.
9. Central Team members can access these requests and provide final review comments and choose the status as Sent Back or Approved.
Note: These final review comments cannot be edited by the team that is seeking approval.
Here's what you should stay tuned for